Category Archives: Linux

Handling Cassandra concurrency issues, using Apache Zookeeper

One of the big problems with CassaFS, when I released the code a week and a half ago, were all the potential write races that could occur – whether it be multiple nodes trying to create the same file or directory at the same time, or writing to the same block at the same time, just to name a few of the potential concurrency scenarios that could play out.

This is because Cassandra doesn’t have the ability to provide atomic writes when updating multiple rows. It can provide atomic writes across multiple columns in a single row, but I would need to redesign the schema of CassaFS to take advantage of this, and even then, there are still going to be a number of operations that need to alter multiple rows, so this is unlikely to help in the long run.

The upshot of this is that in order to do locking, some sort of external mechanism was going to be needed. Preferably one that had some sort of ability to failover to one or more hosts.

After a bit of testing, Apache Zookeeper, described as a “Distributed Coordination Service for Distributed Applications” seems like the perfect candidate for this. It’s easy to configure, the documentation (at least, for the Java interface) is excellent, and they provide plenty of examples to learn from. And the best part, being distributed means that it isn’t a single point-of-failure.

Configuring Zookeeper to work across multiple servers was very simple – it was just a matter of adding the IP addresses and ports of all the servers to the Zookeeper configuration files.

Zookeeper also has a python interface, but other than the inline pydoc documentation, there’s not a lot of explanation of how to use it. I’ve muddled through and put together code to allow locking, based upon the example given on the Zookeeper webpages, here.

The Zookeeper namespace works rather like an in-memory filesystem; it’s a tree of directories/files (nodes). Watches can be set on nodes, which send notifications when a file has changed; I’ve use this facility in the locking code to look for the removal of nodes, when a process is releasing a lock.

import zookeeper
from threading import Condition

cv = Condition()
servers="127.0.0.1:2181"
zh = zookeeper.init(servers)

# not sure what the third and fourth parameters are for
def notify(self, unknown1, unknown2, lockfile):
    cv.acquire()
    cv.notify()
    cv.release()

def get_lock(path):
    lockfile = zookeeper.create(zh,path + '/guid-lock-','lock', [ZOO_OPEN_ACL_UNSAFE], zookeeper.EPHEMERAL | zookeeper.SEQUENCE)

    while(True):
        children = zookeeper.get_children(zh, path)

        # obviously the code below can be done more efficiently, without sorting and reversing

        if children != None:
            children.sort()
            children.reverse()

        found = 0
        for child in children:
            if child < basename(lockfile):
                found = 1
                break

        if not found:
            return lockfile

        cv.acquire()
        if zookeeper.exists(zh, path + '/' + child, notify):
            # Process will wait here until notify() wakes it
            cv.wait()
        cv.release()

def drop_lock(lockfile):
    zookeeper.delete(zh,lockfile)

Using it is straightforward; just call get_lock() before the critical section of code, and then drop_lock() at the end:

def create(path):
    ...
    lockfile = get_lock(path)

    # critical code here

    drop_lock(lockfile)

In CassaFS, I’ve implemented this as a class, and then created subclasses to allow locking based upon path name, inode and individual blocks. It all works nicely, although as one would expect, it has slowed everything down quite a bit.

I used cluster-ssh to test CassaFS before and after I added the locks; beforehand, creating a single directory on four separate servers simultaneously would succeed without error; now, with locking, one server will create the directory, and it will fail on the remaining three.

For anyone on Ubuntu or Debian wanting a quickstart guide to getting Zookeeper up and running, and then testing it a bit, it’s just a matter of:

apt-get install zookeeper
/usr/share/zookeeper/bin/zkServer.sh start
/usr/share/zookeeper/bin/zkCli.sh -server 127.0.0.1:2181
# now we're in the Zookeeper CLI, try creating and deleting a few nodes
ls /
create /node1 foo
get /node1
create /node1/node2 bar
create /node1/node3 foobar
ls /node1
delete /node1/node2
ls /node1
quit

CassaFS – a FUSE-based filesystem using Apache Cassandra as a backend.

A couple of weeks ago, I decided that I wanted to learn how to develop FUSE filesystems. The result of this is CassaFS, a network filesystem that uses the Apache Cassandra database as a backend.

For those who haven’t looked at Cassandra before, it’s a very cool concept. The data it holds can be distributed across multiple nodes automatically (“it just works!”), so to expand a system, it just needs more machines thrown at it. Naturally, to expand a system properly, you need to add extra nodes in the correct numbers, or retune your existing systems; but even just adding extra nodes, without thinking too hard about it, will work, just not efficiently. The trade-off, however, is consistency – in situations where the system is configured to replicate data to multiple nodes, it can take time to propagate through.

Now, I realise I am not the first person to try writing a Cassandra-based filesystem; there’s at least one other that I know of, but it hasn’t been worked on for a couple of years, and Cassandra has changed quite a bit in that time, so I have no idea whether it still works or not.

Getting your mind around Cassandra’s data model is rather tricky, especially if you’re from an RDBMS background. Cassandra is a NoSQL database system, essentially a key-value system, and only the keys are indexed. This means you need get used to denormalising data (ie, duplicating it in various parts of the database), in order to read it efficiently. The best way to design a database for Cassandra is to look carefully at what queries your software is going to need to make, because you’re going to need a column family for each of those.

I hadn’t done any filesystem design before, when I started working on CassaFS, so I naively thought that I could use a file-path as an index. This actually worked, for a while – I had three column families: one for inodes, which contained stat(2) data, one for directories and one containing all the blocks of data:

Inode column family:

Key Data
/ uid: 0, gid: 0, mode: 0755, … etc
/testfile uid: 0, gid: 0, mode: 0644, … etc
/testdir uid: 0, gid: 0, mode: 0755, … etc

Directory column family:

Key Data
/ [ (‘.’, ‘/’), (‘..’, ‘/’), (‘testfile’, ‘/testfile’), (‘testdir’, ‘/testdir’)]
/testdir [(‘.’, ‘/testdir’), (‘..’, ‘/’)]

Block column family:

Key Data
/testfile [(0,BLOCK0DATA), (1,BLOCK1DATA)…]

Of course, this model failed as soon as I thought about implementing hard links, because there’s no way to have multiple directory entries pointing at a single inode, if you’re indexing them by path name. So I replaced pathname indexes with random uuids, and then (naively, again) created a new Pathmap column family, to map paths to UUIDs:

Inode column family:

Key Data
9d194247-ac93-40ea-baa7-17a4c0c35cdf uid: 0, gid: 0, mode: 0755, … etc
fc2fc152-9526-4e33-9df2-dba070e39c63 uid: 0, gid: 0, mode: 0644, … etc
74efdba6-57d4-4b73-94cc-74b34d452194 uid: 0, gid: 0, mode: 0755, … etc

Directory column family:

Key Data
/ [ (‘.’, 9d194247-ac93-40ea-baa7-17a4c0c35cdf ), (‘..’, 9d194247-ac93-40ea-baa7-17a4c0c35cdf), (‘testfile’, fc2fc152-9526-4e33-9df2-dba070e39c63), (‘testdir’, 74efdba6-57d4-4b73-94cc-74b34d452194)]
/testdir [(‘.’, 74efdba6-57d4-4b73-94cc-74b34d452194), (‘..’, 9d194247-ac93-40ea-baa7-17a4c0c35cdf)]

Block column family:

Key Data
fc2fc152-9526-4e33-9df2-dba070e39c63 [(0,BLOCK0DATA), (1,BLOCK1DATA)…]

Pathmap column family:

Key Data
/ 9d194247-ac93-40ea-baa7-17a4c0c35cdf
/testfile fc2fc152-9526-4e33-9df2-dba070e39c63

This enabled me to get hard links working very easily, just by adding extra directory and pathmap entries for them, pointing at existing inodes. I used this model for quite a while, and hadn’t noticed any problem with it because I had forgotten to implement the rename() function (ie, for mv). It wasn’t until I tried building a debian package from source on CassaFS that it failed, and when I tried implementing this, I realised that mapping pathnames wasn’t going to work when renaming a directory, because every file underneath that directory would need to have its pathmap updated.

At that point, I saw it would be necessary to traverse the whole directory tree on every file lookup, to find its inode, and then just give the root inode a UUID of 00000000-0000-0000-0000-000000000000, so that it can be found easily. This way, I could use UUIDs as the Directory column family index, and do away with the Pathmap column family entirely.

Inode column family:

Key Data
00000000-0000-0000-0000-000000000000 uid: 0, gid: 0, mode: 0755, … etc
fc2fc152-9526-4e33-9df2-dba070e39c63 uid: 0, gid: 0, mode: 0644, … etc
74efdba6-57d4-4b73-94cc-74b34d452194 uid: 0, gid: 0, mode: 0755, … etc

Directory column family:

Key Data
00000000-0000-0000-0000-000000000000 [ (‘.’, 00000000-0000-0000-0000-000000000000 ), (‘..’, 00000000-0000-0000-0000-000000000000), (‘testfile’, fc2fc152-9526-4e33-9df2-dba070e39c63), (‘testdir’, 74efdba6-57d4-4b73-94cc-74b34d452194)]
74efdba6-57d4-4b73-94cc-74b34d452194 [(‘.’, 74efdba6-57d4-4b73-94cc-74b34d452194), (‘..’, 900000000-0000-0000-0000-000000000000)]

Block column family:

Key Data
fc2fc152-9526-4e33-9df2-dba070e39c63 [(0,BLOCK0DATA), (1,BLOCK1DATA)…]

Yesterday, I discovered the Tuxera POSIX Test Suite, and tried it on CassaFS. At a rough estimate, it’s failing at least 25% of the tests, so there’s still plenty of work to do. At this stage, CassaFS is not useful for anything more than testing out Cassandra, as a way of getting a lot of data into it quickly, and trying out Cassandra’s distributed database abilities (except, since I have currently hardcoded 127.0.0.1:9160 into CassaFS, it will require some slight adjustment for this to actually work). You can even mount a single filesystem onto multiple servers and use them simultaneously – but I haven’t even begun to think about how I might implement file locking, so expect corruption if you have multiple processes working on a single file. Nor have I done any exception handling – this is software that is in a very, very early stage of development.

It’s all written in Python at present, so don’t expect it to be fast – although, that said, given that it’s talking to Cassandra, I’m not entirely sure how much of a performance boost will be gained from rewriting it in C. I’m still using the Cassandra Thrift interface (via Pycassa), despite Cassandra moving towards using CQL these days. I’m not sure what state Python CQL drivers are in, so for the moment, it was easier to continue using Pycassa, which is well tested.

For Debian and Ubuntu users, I have provided packages (currently i386 only because of python-thrift – I’ll get amd64 packages out next week) and it should be fairly simple to set up – quickstarter documentation here. Just beware of the many caveats that I’ve spelt out on that page. I’m hoping to get packages for RHEL6 working sometime soon, too.

Displaying caller-ID from a VOIP phone on the desktop.

I’ve had a Snom 300 VOIP phone for a few years now; it’s a nice little phone, and can even run Linux, although I haven’t ever tried doing so. At one point, I had it connected up to an elaborate Asterisk setup that was able to get rid of telemarketers and route calls automatically via my landline or VOIP line depending on whichever was the cheapest. These days, I no longer have the landline and don’t really want to run a PC all day long, so I’m just using the phone by itself through MyNetFone.

Unfortunately, the LCD display on it seems to have died; the vast majority of vertical pixel lines are displayed either very faintly, or not at all:

It’s probably not all that hard to fix, assuming that it’s just a matter of replacing the display itself and not hunting for a dead component, but I decided instead to have a look and see what the software offers to work around this – and discovered the Snom’s “Action URLs”.

Basically, the phone can make HTTP requests to configurable URLs when it receives one of a number of events – for example, on-hook, off-hook, call-forwarding … and incoming call, just to name a few. It can also pass various runtime variables to these; so for an incoming call, for example, you could add the caller-id to the url and then get a server to process this.

After a little bit of messing around, I hooked this into GNOME’s notification system, via the Bottle python web framework (which is probably overkill for something like this), and the end result is cidalert, a desktop caller-id notification system:

The source is up on Bitbucket, should anyone think of any cool features to add to it.

Building a redundant mailstore with DRBD and GFS

I’ve recently been asked to build a redundant mailstore, using two server-class machines that are running Ubuntu. The caveat, however, is that no additional hardware will be purchased, so this rules out using any external filestorage, such as a SAN. I’ve been investigating the use of DRBD in a primary/primary configuration, to mirror a block device between the two servers, and then put GFS2 over the top of it, so that the filesystem can be mounted on both servers at once.

While a set-up like this is more complex and fragile than using ext4 and DRBD in primary/secondary mode and clustering scripts to ensure that the filesystem is only ever mounted on one server at a time, it’s likely that there will be a requirement for GFS on the same two servers for another purpose, in the near future, so it makes sense to use the same method of clustering for both.

The following guide details how to get this going on Ubuntu 10.04 LTS (lucid). It won’t work on any version older than this – the servers that this is destined for were originally running 9.04 (Jaunty), however, I’ve tested DRBD+GFS on that release, and there’s a problem that prevents it from working. As far as I’m concerned, production servers should not be run on non-LTS Ubuntu releases, anyway, because the support lifecycle is far too short. This guide should also work fine for Debian 6.0 (squeeze), although I haven’t tested it, yet.

One thing to keep in mind – the Ubuntu package for gfs2-tools claims that “The GFS2 kernel modules themselves are highly experimental and *MUST NOT* be used in a production environment yet”. There’s a problem with this, however – the gfs2 module is available in the kernel, in Ubuntu 10.04, but the original gfs isn’t there (it wasn’t ever there) and the redhat-cluster-source package which provides it, doesn’t build. I’m inclined to say that the “experimental” warning is incorrect.

Firstly, install DRBD:

apt-get install drbd8-utils drbd8-source

We have to install the drbd8-source package in order to get the drbd kernel module. When drbd is started, it should automatically run dkms to build and install the module.

Now, the servers I’m using have their entire RAID already allocated to an LVM volume group named vg01, so I’m going to create a 60Gb logical volume within this volume group, to be used as the backing store for the DRBD block device on each. Obviously, this step isn’t compulsory and the DRBD block devices, can be put on a plain disk partition instead.

lvcreate -L 60G -n mailmirror vg01

After this, configure /etc/drbd.conf on both servers:

global {
  usage-count yes;
}

common {
  protocol C;
}
resource r0 {
  net {
    allow-two-primaries;
    after-sb-0pri discard-zero-changes;
    after-sb-1pri discard-secondary;
    after-sb-2pri disconnect;
  }
  syncer {
    verify-alg sha1;
  }
  startup {
    become-primary-on both;
  }
  on mail01 {
    device    /dev/drbd0;
    disk      /dev/vg01/mailmirror;
    address   10.50.0.11:7789;
    meta-disk internal;
  }
  on mail02 {
    device    /dev/drbd0;
    disk      /dev/vg01/mailmirror;
    address   10.50.0.12:7789;
    meta-disk internal;
  }
}

With this done, we can now set up the DRBD mirror, by running these commands on each server:

drbdadm create-md r0
modprobe drbd
drbdadm attach r0
drbdadm syncer r0
drbdadm connect r0

…and to start the replication between the two block devices, run the following on only one server:

drbdadm -- --overwrite-data-of-peer primary r0

By looking at /proc/drbd, we’ll be able to see the servers syncing. It’s likely that this will take a long time to complete, but the drbd device can still be used, while that’s happening. One last thing we need to do is move it from primary/secondary mode, into primary/primary mode, by running this on the other server:

drbdadm primary r0

So, now we want to create a GFS2 filesystem. There’s a catch here, however: GFS2 cannot sit directly on a DRBD block device. Instead, we need to put an LVM physical volume on the DRBD device, and then create a volume group and logical volume within that. Furthermore, because this is going on a cluster, we need to use clustered LVM and associated clustering software:

apt-get install cman clvm gfs2-tools

And then configure the cluster manager on each server. Put the following in /etc/cluster/cluster.conf:

<?xml version="1.0" ?>
<cluster alias="mailcluster" config_version="6" name="mailcluster">
        <fence_daemon post_fail_delay="0" post_join_delay="3"/>
        <totem consensus="6000" token="3000"/>
        <clusternodes>
                <clusternode name="mail01" nodeid="1" votes="1">
                        <fence>
                                <method name="1">
                                        <device name="clusterfence" nodename="mail01"/>
                                </method>
                        </fence>
                </clusternode>
                <clusternode name="mail02" nodeid="2" votes="1">
                        <fence>
                                <method name="1">
                                        <device name="clusterfence" nodename="mail02"/>
                                </method>
                        </fence>
                </clusternode>
        </clusternodes>
        <cman expected_votes="1" two_node="1"/>
        <fencedevices>
                <fencedevice agent="fence_manual" name="clusterfence"/>
        </fencedevices>
        <rm>
                <failoverdomains/>
                <resources/>
        </rm>
</cluster>

In the above, I’m using manual fencing, because at the moment, I don’t have any other method for fencing available to me. This should not be done in production; it needs a real fencing device, such as an out-of-band management card (eg, Dell DRAC, HP iLO) to kill power to the opposite node, if something is amiss. All that manual fencing does is write messages to syslog, saying that fencing is needed.

Without fencing, it’s possible to encounter a situation where the DRBD device might have stopped mirroring, yet the mail spool is still mounted on each server, with the mail daemon on each one writing to its GFS filesystem independently, and that would be a very difficult mess to clean up.

One other thing: there’s an Ubuntu-specific catch here – Ubuntu’s installer has this irritating habit of putting a host entry in /etc/hosts for the hostname with an IP address of 127.0.1.1. This will break the clustering, so remove the entry from both servers, and either make sure your DNS is set up correctly for the name that you’re using in your cluster interfaces, or add the correct addresses to the hosts file.

You can now start up clustering on both hosts:

/etc/init.d/cman start

Run cman_tool nodes, and if all is well, you’ll see:

Node  Sts   Inc   Joined               Name
   1   M    120   2011-09-14 10:53:32  mail01
   2   M    120   2011-09-14 10:53:32  mail02

We’ll need to make a couple of modifications to /etc/lvm/lvm.conf on both servers. Firstly, to make LVM use its built-in clustered locking:

locking_type = 3

…and secondly, to make it look for LVM signatures on the drbd device (in addition to local disks):

filter = ["a|sd.*|", "a|drbd.*|", "r|.*|"]

Now start up clvm:

/etc/init.d/clvm start

At this point, we can create the LVM physical volume on the drbd device. Because we now have a mirror running between the two servers, we only need to do this on one server:

pvcreate /dev/drbd0

Run pvscan on the other server, and we’ll be able to see that we have a new PV there.

Now, again, on only one server, create the volume group:

vgcreate mailmirror /dev/drbd0

Run vgscan on the other server, to see that the VG also appears there.

Next, we’ll create a logical volume for the GFS filesystem (I’m leaving 10Gb of space spare for a second GFS filesystem in the future):

lvcreate -L 50Gb -n spool mailmirror

And then lvscan on the other server should show the new LV.

The final step is to create the GFS2 filesystem:

mkfs.gfs2 -t mailcluster:mailspool -p lock_dlm -j 2 /dev/mailmirror/spool

mailcluster is the name of the cluster, as defined in /etc/cluster/cluster.conf, while mailspool is a unique name for this filesystem.

We can now to mount this filesystem on both servers, with:

mount -t gfs2 /dev/mailmirror/spool /var/mail

That’s it! We now have have a redundant mailstore. Before starting your mail daemon, however, I’d suggest changing its configuration to use maildir instead of mbox format, because having multiple servers writing to an mbox file is bound to cause corruption at some point.

Other recommended changes would be to alter the servers’ init scripts so that drbd is started before cman and clvm.

Paul Dwerryhouse is a freelance Open Source IT systems and software consultant, based in Australia. Follow him on twitter at http://twitter.com/pdwerryhouse/.

Upgrading an Acer Aspire One D150 from an HDD to an SSD

As I mentioned in my previous post, the hard disk in my Acer Aspire One D150 had some issues last week, to the extent that I don’t trust it anymore and planned to replace it with an SSD drive instead.

After soliciting advice from the good people on the LUV mailing list, I ordered a Kingston SSDNow V Series SNV425-S2BN/128GB 2.5″ drive from Newegg.

Transferring the contents of the old drive to the new turned out to be far simpler than I expected, as the SSD drive came with a USB-SATA dock; I’d been planning on copying all the data onto a different drive, then booting Linux from an SD card and copying it all back onto the new drive. The dock made it all very easy, as I could carve out the partitions (keeping in mind this advice about aligning filesystems to an SSD’s erase block size) and then copy all the data across to the new drive from my existing disk (noting to make changes to /etc/fstab and /boot/grub/menu.lst, as I had to change the name of the LVM volume group). I also have a small windows XP partition on the netbook, mainly for emergency use when having to deal with idiotic telcos, which I copied across using dd.

Changing the disk inside the Acer couldn’t have been easier; it has a slot on the bottom that gives direct access to it; just remove the two screws and lift the lid:

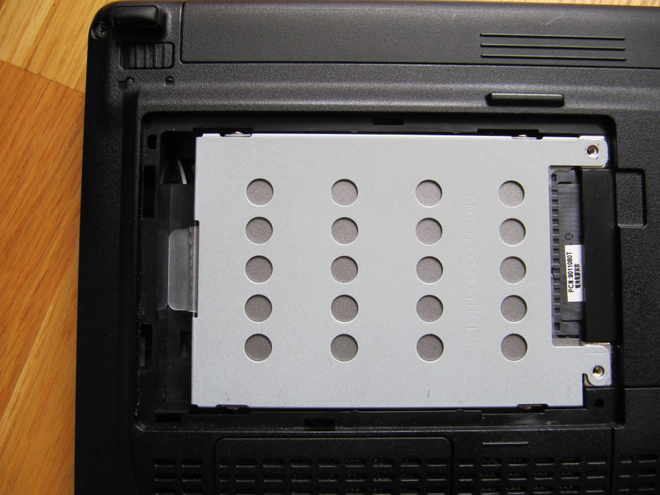
This exposes the hard drive, which is sitting upside down in a tray:

To remove it, I simply slid the whole tray away from the SATA connector to the outside of the laptop case (ie, to the left, in the above photo) and lifted it out. After that, I removed the four screws holding the HDD into the tray, and replaced it with the SDD drive:

The SSD drive then slid straight into the SATA connectors in the netbook – exactly the same form factor as the old drive.

I was surprised to find that grub worked straight away, when booting up – I’ve had a history of messing up manual grub installations. Linux started up, but I soon found that I’d forgotten to rebuild the initramfs, and it was having trouble with the new LVM volume group name. Once that problem was solved, it booted without any further issues.

Windows XP was a little trickier – it simply wouldn’t boot at all. I soon found that this was because XP doesn’t like it when the starting sector of its partition changes. Fortunately, someone has written a program called relocntfs that allows this to be fixed from Linux. After I ran that on the XP partition, it worked perfectly.

The one final issue that I had was that resuming from hibernation no longer worked. It turns out that Ubuntu stores the UUID of the swap space partition in /etc/initramfs-tools/conf.d/resume; obviously the uuid of the swap space changed when I created the partitions on the new disk, so I had to put the new UUID had to be put into this file and then build a new initramfs.

The new SSD drive has been running well in the netbook for about 12 hours now. I haven’t noticed any particular increase or decrease in file access speed, but it is rather pleasant not feeling the vibration or hearing the whirr of a hard disk anymore.

Redmine packages for Debian and Ubuntu

Redmine is a web-based project-management / bug-tracking tool, much like Trac, but so, so much better. Unfortunately, like so many web-based projects, there doesn’t appear to have been much thought given to installing it on live, production systems – the general idea seems to be to unpack it in a random location on your server’s filesystem and run it from there. Most sites I know would baulk at the idea of this, so I’ve created Debian and Ubuntu packages for it.

They’re a little kludgy, at this stage – it seems to me that Ruby-on-Rails goes out of its way to be difficult to Debianise – but they work, nonetheless, and make installation fairly straightforward (although there are still manual steps involved – be sure to read the README.Debian). The packages depend on Mongrel, a small Ruby webserver; I tried getting Redmine to run under Apache, but running it with CGI was far too slow, and making it work with fastcgi appeared to be an exercise in futility.

I only want one gxine.

gxine is my Linux media player of choice, partly because it’s nice and light, but mostly because it just works, unlike certain other players which will remain nameless. It has a nice feature that allows only one instance of it to be invoked on any one desktop, so if you play a number of files/streams from external applications, you don’t end up with multiple copies of gxine running.

Unfortunately, for the last few months, this feature has been broken in Debian (and Ubuntu too, so it seems … and now that I look at it, the problem comes from upstream). A bit of a look into the code shows that the reason for this is that at some point, gxine moved its configuration files from $HOME/.gxine/ to $HOME/.config/gxine/ – a bizarre location which just reeks of GNOME or some other overly-pedantic committee – but the server code has been left in the old location, and hence the socket for communication can’t be created.

The following (trivial) patch fixes it:

diff -urN gxine-0.5.903/src/server.c gxine-0.5.903.fixed/src/server.c
--- gxine-0.5.903/src/server.c  2008-08-08 20:29:48.000000000 +1000
+++ gxine-0.5.903.fixed/src/server.c    2008-02-12 04:18:45.000000000 +1100
@@ -40,7 +40,7 @@
 #define LOG
 */
 
-#define SOCKET_FILENAME "%25s/.gxine/socket"
+#define SOCKET_FILENAME "%25s/.config/gxine/socket"
 #define BUF_SIZE        1024
 
 static int       gxsocket;

Screen-scraping Melbourne’s TramTracker information.

Melbourne’s tram operator, Yarra Trams, provides a web and sms system called TramTracker, that can tell you the time of the next tram that will arrive at any given stop, using a combination of real-time information and scheduled timetables. It uses the same system that drives the passenger information displays that can be seen around inner-city tram stops.

The web-service is pretty nasty, however. It doesn’t render very well for me using Galeon, and worse, it doesn’t keep any state information, so you have to keep retyping the tram-stop code every time you want to look up the information on your tram. And having to launch a web-browser to just look up the time of the next tram is annoying; it would be nicer to have either a command line interface, or perhaps even a small application running in a docked window.

It also assumes that you only wish to catch a tram from one stop; if, like me, you’re within walking distance of two or more different tram lines that can take you to a particular destination, then you have to do multiple lookups, which is a waste of time.

So, with this in mind, I pulled out Wireshark and had a look at the HTTP traffic that was being passed when making a request to the service. The following was the most interesting part:

tkScriptManager=upnMain|btnPrediction&
tkScriptManager_HiddenField=%253B%253B
AjaxControlToolkit%252C%2520Version%253D1.0.10618.0
%252C%2520Culture%253Dneutral%252C%2520PublicKeyToken%25 [blah blah blah…]
&__EVENTTARGET=&__EVENTARGUMENT=&__LASTFOCUS=
&__VIEWSTATE= [blah blah blah…]
txtTrackerID=1919&ddlRouteNo=Any&btnPrediction=

The number 1919 was the tramstop code that I’d entered. So I quickly threw together a small web form, with hidden variables txtTrackerID, ddlRouteNo and btnPrediction, which sent a request to the tramtracker interface, but unfortunately this wasn’t enough and it kept returning to the start page.

After a bit of trial and error, I found that it also needed to be passed these variables: tkScriptManager, __EVENTTARGET, __EVENTARGUMENT, __LASTFOCUS and __VIEWSTATE. Fortunately it didn’t need any of the long-winded variables with public key tokens in them.

I was rather happy to find that the output from the service was XHTML, however this feeling soon dissipated when I discovered that whoever wrote this clearly didn’t have a clue that XML would only work if well-formed and that they hadn’t closed off any of their br or img tags. Sigh, so many useless “web programmers” out there, so few jail sentences. This ruled out using XML::Simple to parse it, and I had to settle for kludging it with HTML::TableExtract.

The upshot of all this is the NextTram perl script, which will return the times of the next trams arriving at multiple tram stops, sorted by time:

$ ./nexttram 1419 1259 1216
1:Sth Melb Beach:0
19:Flinders St City:6
8:Toorak:9
55:Domain Interchange:10
1:Sth Melb Beach:13
19:Flinders St City:18
55:Domain Interchange:26
19:Flinders St City:31
55:Domain Interchange:39

While I realise that it has a limited potential audience (Linux/Unix users in inner Melbourne suburbs who actually care about what times trams run, ie, probably just me), I’ve released it under the GPL in the hope that it might go onto bigger and better things. Of course, it will probably just break next time Yarra Trams upgrades their website…

Docbook 5.0 in 5.0 minutes

I quite like Docbook. The syntax is simple enough to pick up quickly, which means I can churn out documents without much effort, and more importantly, without having to fire up a bloated office suite. Furthermore, the documents that it produces look great, which is far more than I can say for anything I’ve put together with a wysiwyg word processor – I will freely admit that I have no artistic skills, whatsoever.

The biggest problem with Docbook, however, is the tools needed to convert it from xml to other formats (eg, pdf, html, etc) – or rather – the documentation of the tools, ironically enough. Most of the information out there seems to have been written to be so platform independent that it’s next to useless for any real-world situation.

So, in the interests of hopefully saving someone the hours that I’ve spent trying to get this working for my specific case, here’s a quick guide to writing and publishing a Docbook 5.0 document, on Debian sid.

Firstly, get the Debian package source to xmlto and apply the patch attached to Debian bug 416622; this gives xmlto support for dblatex, as it currently expects to use passivetex and it has been removed from Debian. Hopefully the patch will be applied upstream and this step won’t be needed in the future.

Install the following Debian packages: docbook, docbook-xml, docbook-dsssl, docbook-xsl, dblatex, xsltproc. Build and install the patched version of xmlto, and install any dependencies it requests.

Now, a simple docbook document. Write this to index.xml:

<?xml version=”1.0″ standalone=”no”?>

<!DOCTYPE book PUBLIC “-//OASIS//DTD DocBook XML V5.0//EN”
“http://www.oasis-open.org/docbook/xml/5.0b5/dtd/docbook.dtd”>

<book xmlns=”http://docbook.org/ns/docbook” version=”5.0″>

<info>
<title>My book</title>

<author>
<personname>
<firstname>Paul</firstname>
<surname>Dwerryhouse</surname>
</personname>
</author>
</info>

<chapter>
<title>Introduction</title>

<para>This is the first paragraph.</para>
</chapter>

<chapter>
<title>Stuff</title>

<section>
<title>Information</title>
<para>This is the first section.</para>
</section>
</chapter>

<chapter>
<title>Conclusion</title>

<para>This is the last paragraph.</para>
</chapter>

</book>

Note the DOCTYPE line. I can’t tell if Docbook 5.0 has been officially released or not. Wikipedia suggests that it is, but the 5.0 DTD is not available on the OASIS website, only a beta.

You can now convert this to html with:

xmlto html index.xml

…or pdf with:

xmlto –with-dblatex pdf index.xml

If you’re writing a huge document, and want to break it down into multiple files, then you can use XInclude:

<?xml version=”1.0″ standalone=”no”?>

<!DOCTYPE book PUBLIC “-//OASIS//DTD DocBook XML V5.0//EN”
“http://www.oasis-open.org/docbook/xml/5.0b5/dtd/docbook.dtd”>

<book xmlns=”http://docbook.org/ns/docbook” version=”5.0″>

<xi:include xmlns:xi=”http://www.w3.org/2001/XInclude” href=”info.xml” />
<xi:include xmlns:xi=”http://www.w3.org/2001/XInclude” href=”ch01.xml” />
<xi:include xmlns:xi=”http://www.w3.org/2001/XInclude” href=”ch02.xml” />
<xi:include xmlns:xi=”http://www.w3.org/2001/XInclude” href=”ch03.xml” />

</book>

The above example will then read in four files, info.xml, ch01.xml, ch02.xml and ch03.xml, which contain the information section and the three chapters from the first example.

Change management sucks.

Adding insult to injury:

It’s bad enough that due to “heightened change procedures“, I am required to submit a change request – with 14 days lead time – to compress a bunch of log files, on an 85%25 full filesystem. But for that change to then be rejected?

Fine, let it break. It’ll cost more to fix it, then. At least I now know why my phone bill is so expensive.